CONTENTS

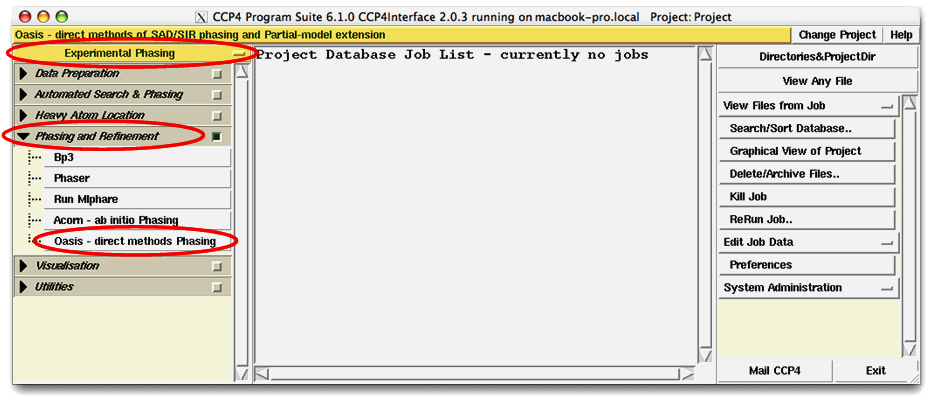
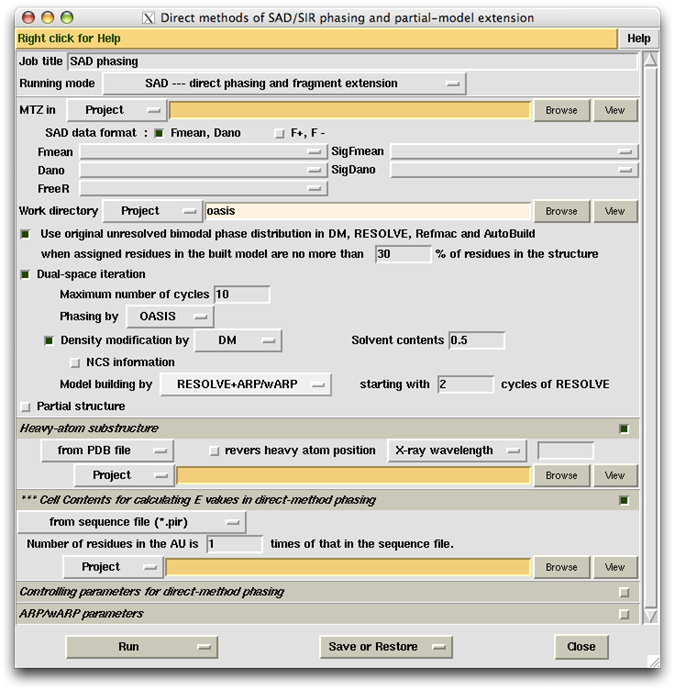
Clicking on the item "Oasis - direct methods Phasing" (see the figure above) will bring up a blank OASIS control panel (see the figure below). It is used for setting up conditions/parameters for either a single run or an iterative OASIS process. This will be described in detail later.
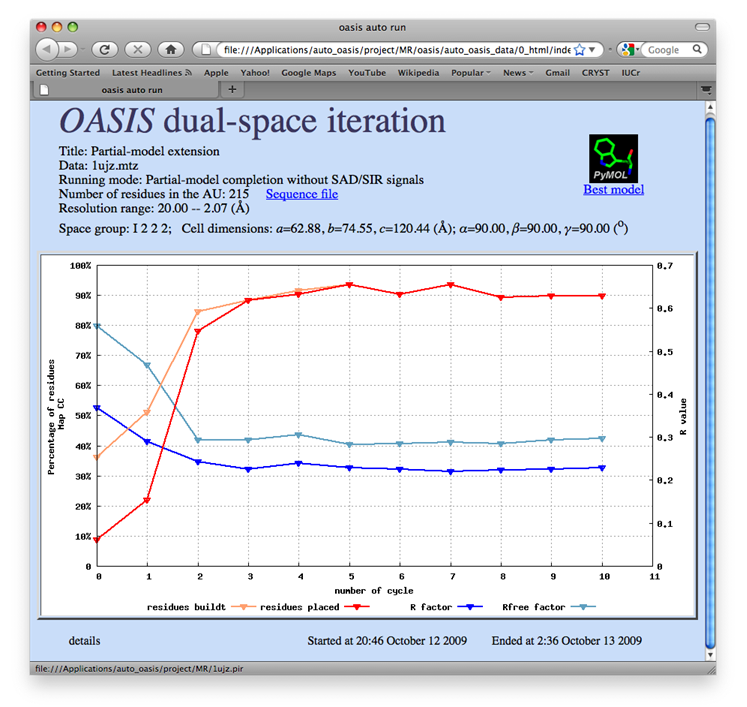
Starting an OASIS iterative process will bring up the monitoring board (see the following figure), which is a graphical monitor for OASIS jobs. If for some reasons the board does not appear, or when the job has completed and the board is closed, the user can recall the board at:
(Work directory) /auto_oasis_data/0_html/index.html

On the monitoring board, there is a Gnuplot graph displaying the progress of the iteration process. Besides, the user can click on "details" at bottom left to get a detail list for all finished cycles (see the figure below) or click on "Sequence file" to check the file's contents. By clicking the PyMOL logo on top right, the current-available "best model" (stored in a PDB file) will be opened and can be manipulated by PyMOL [DeLano, W.L. (2002). The PyMOL Molecular Graphics System (San Carlos, CA: DeLano Scientific)] (see the figure after the next one).

The first thing to do on the control panel is to select the "Running mode". Click the button next to "Running mode" and select from the pulldown menu what would you like the job to do.
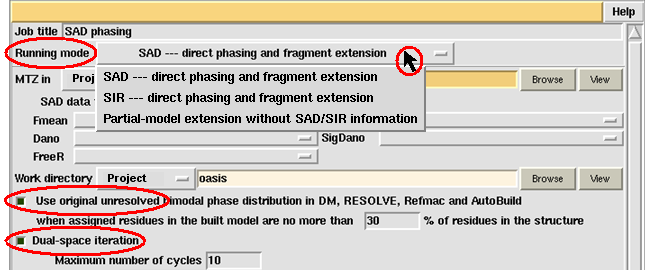
Three choices are available (see the above figure). Suppose you take "SAD --- direct phasing and fragment extension", then the default "Job title" will be "SAD phasing". You can change the contents of "Job title" by putting any character string into the adjacent slot.
Two items are seen at the bottom of the above figure. They are related to some features of OASIS4.0 and are by default selected. Right click the first item "Use original unresolved ...", a message window will appear giving explanations for that item (see the figure below).

Close the above message window and right click the second item "Dual-space iteration" will bring up another message window as below.

From the item "Use original unresolved ..." downward, you can right click an item (including buttons, slots and widgets) on the control panel and get some explanations for that item. Such messages make up an imporant part of the tutorials of OASIS4.0.
After choosing the "Running mode", the user should specify the location of the diffraction data file (in mtz format) in the slot next to the label "MTZ in". The user should also specify a "Work directory", which by default will be a subdirectory named "oasis" under the CCP4 directory "Project" (see the following figure). The "Work directory" will keep all intermediate files for the whole iterative process.

If instead of an iterative process you wish to make a single run of OASIS, then you should unselect the item "Dual-space iteration". In this case you should specify the location of the output file in the slot next to the label "MTZ out" (see the figure below). Notice that, in this case the control panel will not provide the function of automatic model building.
Partial-structure information is compulsory in "Partial-model extension" mode, but it is optional in SAD and SIR mode. Partial-structure information should be provided with a file in either PDB format or OASIS format. The user would right click the button "from PDB file" and the following slot (shown on the figure below) for details.

Default controlling parameters for partial-model extension are set on the control panel as shown on the lower-half part of the above figure. In most cases, it is no need to change the default settings. However if you want to change something, before you do it, please right click the corresponding item to learn more.
Information of the heavy-atom substructure is conpulsory for SAD/SIR phaing. This can be provided by specifying the location of a file in the pink slot (see the figure below), or by entering the necessary atomic parameters on the control panel (see the lower-half part of the following figure). The item "X-ray wavelength" is only necessary for SAD phasing, which is used to calculate the imaginary-part correction (f") of atomic scatterring factors. Click on the button "X-ray wavelength", you can select the alternative to input f" instead of X-ray wavelength.
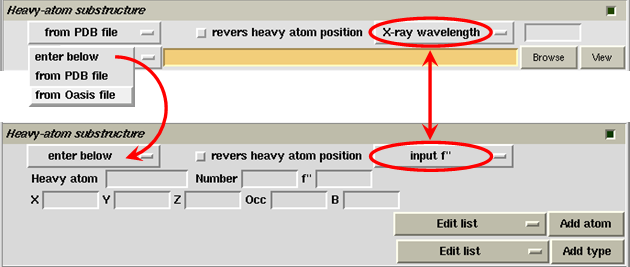
In the "Partial-model extension" mode, the item "Heavy-atom substructure" will not appear on the control panel. Instead, there will be a widget "Heavy atom" next to the "Running mode" button as shown below. If the user wants to input the heavy-atom substructure, please select the widget to bring up the item "Heavy-atom substructure".

Unit-cell contents are necessary for calculating normalized structure amplitudes E(h,k,l) in direct-method phasing. For this purpose the user should specify the sequence file in the pink slot (see the above figure). If the sequence file does not have the suffix "pir", then please click the button "from sequence file (*.pir)" and select the option "from other sequence file (*.*)". If your protein consists of n identical molecules, the sequence file should only contains residues of one molecule and, the number "1" in the widget above the pink slot should be replaced by the number "n".
In case you don't have the sequence file, the unit-cell contents can also be calculate from the "number of residues in asymmetric unit". However, this option is only available for a single run , i.e. you should turn off (unselect) the item "Dual-space iteration" on the control panel.
The default controlling parameters for direct-method phasing are provided near the bottom of the control panel as shown on the figure below. Values defining the resolution range are detected automatically from the input data. In most cases, it is no need to change any thing of the default settings. For details of each setting, please right click the corresponding item on the control panel.
Limited items for controlling ARP/wARP are available on the control panel (see the figure below). The user is referred to ARP/wARP documents for more details. In our experience, when the model-building result is not satisfactory, unselect the item "Use dipeptide distribution ..." may give chance to get a better result. The item "Include dummy atoms ..." is a special function of OASIS dual-space iteration. By default it is selected in SAD/SIR phasing, but is unselected in Partial-model extension. Right click this item to get more explanations.
Limited items for controlling PHENIX.AutoBuild are available on the control panel (see the figure below). The user is referred to PHENIX documents for more details. The item "Secondary structure only" is important in model-building on electron-density maps at low resolution. By default it is selected for model building at lower than 3 Å resolution.
In the following, 4 examples are shown using 3 sets of test data, which are summarized in the table.
| Protein | E7_C-Im7_C complex | Xylanase | TTHA1012 |
| Space group | I222 | P21 | P212121 |
| Unit-cell | a=62.88, b=74.55, c=120.44Å |
a=41.19, b=67.18, c=50.88Å; β=113.47o |
a=41.35, b=58.77,
c=80.49Å |
| Resolution limit (Å) | 2.1 | 1.8 | 2.2 |
| X-rays | Synchrotron | 1.49Å synchrotron | Cr Kα (2.291Å) |
| Number of residues in the AU |
215 | 303 | 213 |
| Anomalous scatterers (sulfur atoms) in the AU |
6 | 2 | |
| Bijvoet ratio (<|ΔF>|/< F >) (%) | 0.56 | 0.83 | |
| Solvent content (%) | 37 | 47 | |
| Data multiplicity | 15.9 | 13.5 | |
| Reference | PDB code 1ujz | Acta Cryst. D59, 1020 (2003) |
PDB code 2yzy |
All the following examples were calculated under Mac OS X version 10.5.8 with
CCP4 version 6.1.0
ARP/wARP version 7.0.1
REFMAC version 5.5.0066
PHENIX version 1.3 final and
OASIS version 4.0
This example was designed to simulate a difficult situation. The test protein consists of two molecules A and B containing respectively 87 and 128 residues. Molecule A of a similar complex (PDB code 1bxi) bears 60% sequence identity to molecule A of E7_C-Im7_C. The root-meansquare deviation between the two A molecules is 1.38 Å. Molecule A of 1bxi was pruned using the program CHAINSAW [Acta Cryst. D60, 1229-1236 (2004)] to provide a search model for PHASER [Acta Cryst. D57, 1373-1382 (2001)] to implement molecular replacement. The output model (on the left of the figure below) was then used as the starting model of OASIS MR-model completion. The result is shown on the right of the figure.
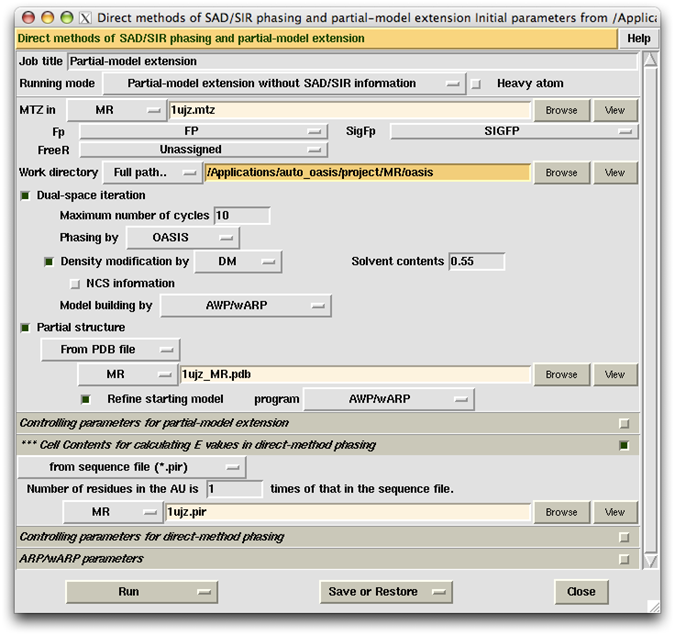
In this example, the "ARP/wARP parameters" are set as default. The item "Use dipeptide distribution ... " is selected, while the item "Include dummy atoms ... " is unselected. This is opposite to that of the example "Iterative SAD phasing (TTHA1012)" (see the first figure of that example). In our experience, by changing the setting of these two items to the opposite of the default, a better result may be obtained in some difficult cases.
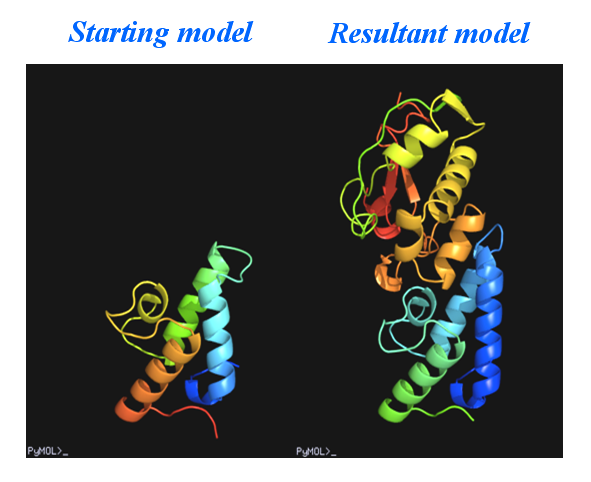
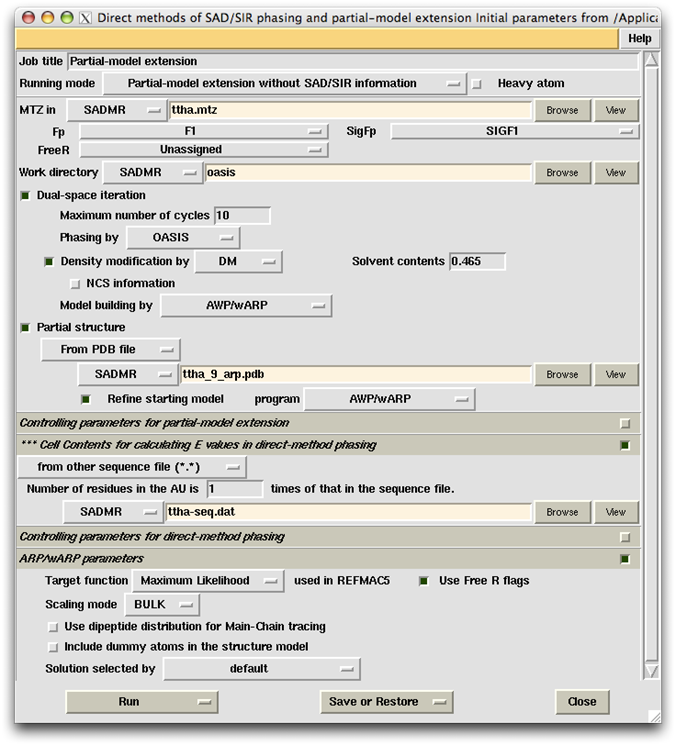
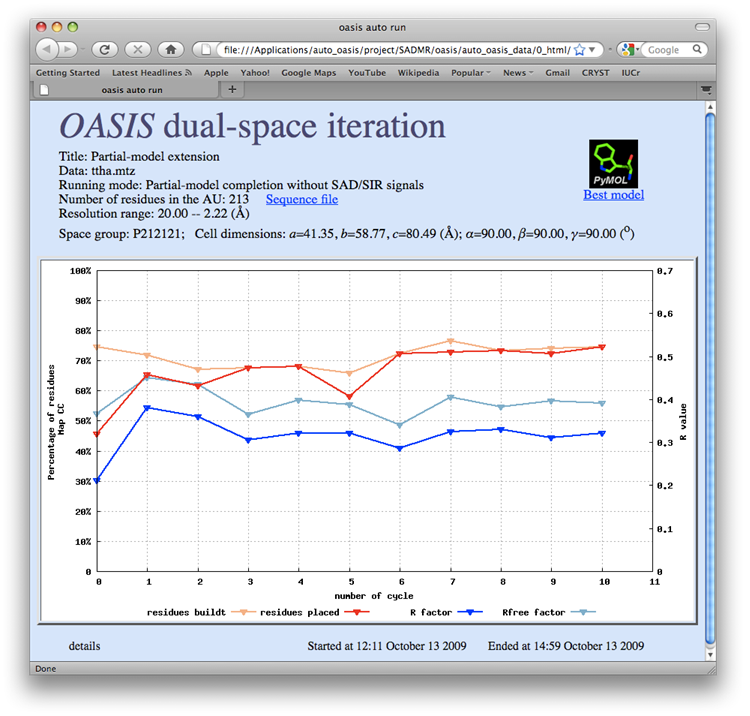
The control panel with settings for this example, the monitoring board recording the whole process and the PyMOL display of the resultant model are also shown respectively in the following figures.
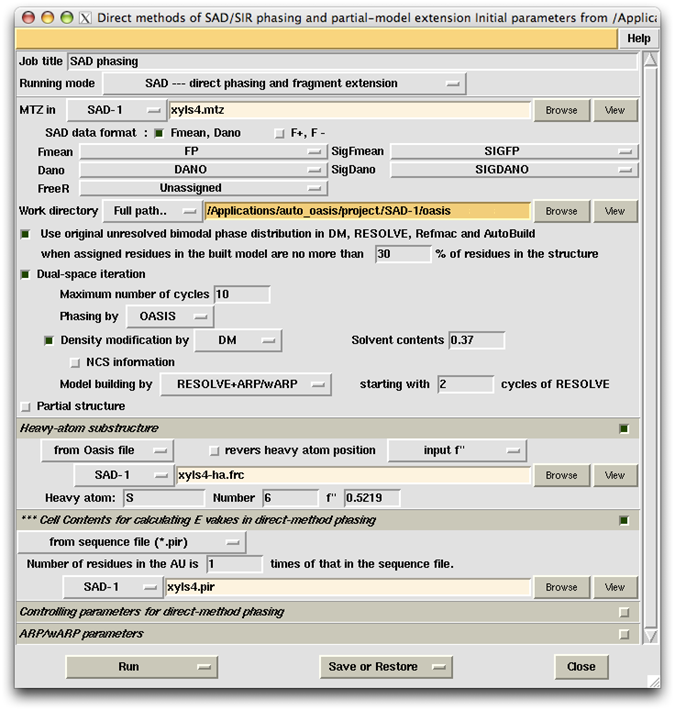
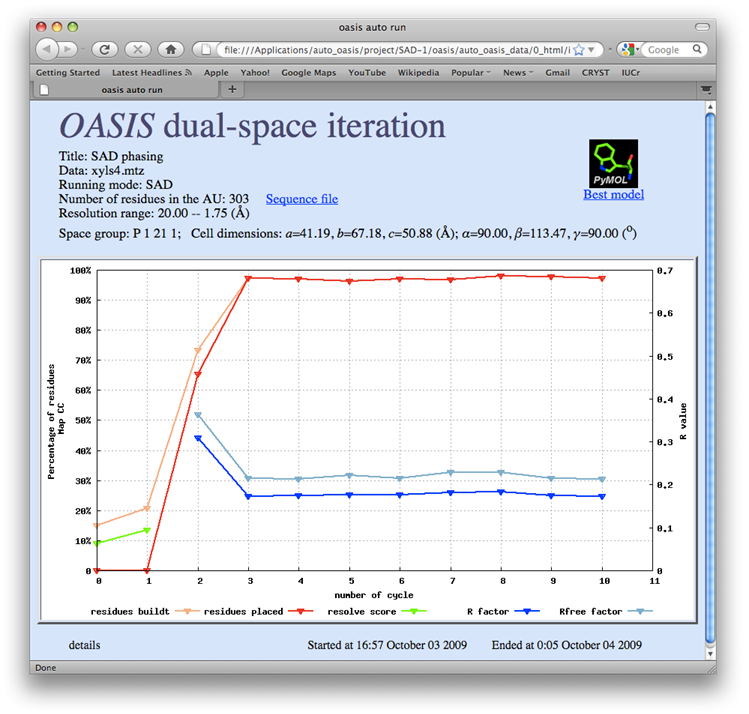
The data set of xylanase has a Bijvoet ratio (<|ΔF|>/< F >) of 0.56% and the solvent content of the crystal is only 37%. The data was concluded by Ramagopal et al. [Acta Cryst. D59, 1020-1027 (2003)] as lacking 'sufficient phasing power to produce interpretable electron-density maps'. The control panel with settings for this example, the monitoring board recording the whole process and the PyMOL display of the resultant model are respectively shown in the following figures. As is seen, with this data set the iterative SAD phasing involving OASIS, DM, RESOLVE and ARP/wARP resulted in a model amount to 97% of the whole structure.
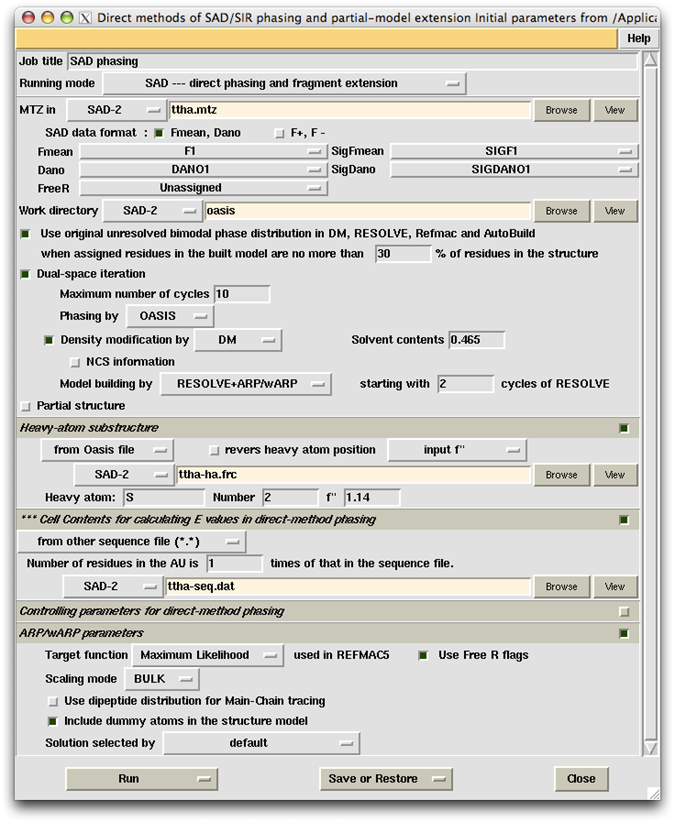
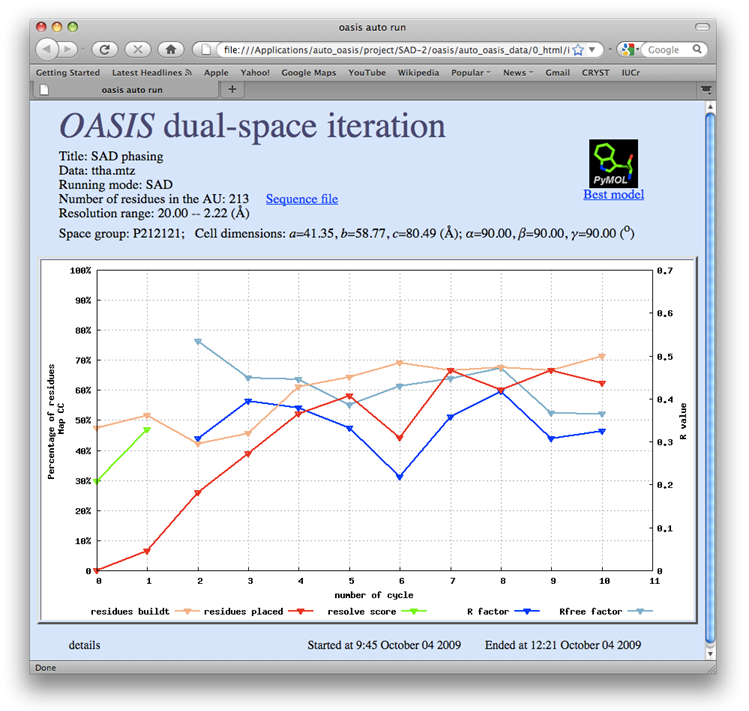
TTHA1012 represents a very difficult case of sulfur-SAD phasing. The control panel with settings for this example, the monitoring board recording the whole process and the PyMOL display of the resultant model are respectively shown in the following figures. The result from the iterative SAD phasing involving OASIS, DM, RESOLVE and ARP/wARP amount to only 67% of the whole structure. However such a result still provides an adequate base for a successful manual model completion.
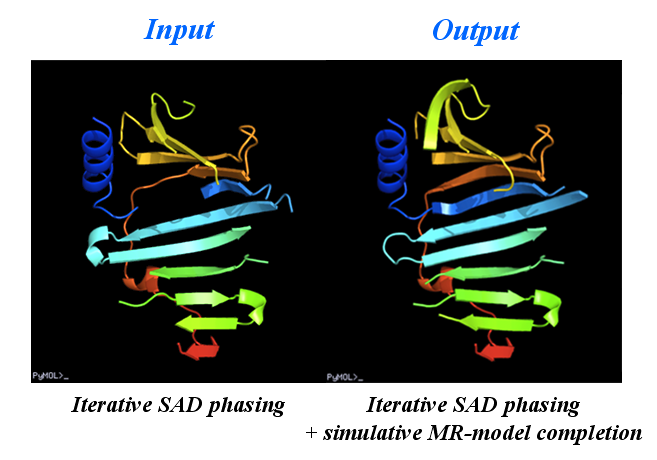
This is a special application of OASIS. The resultant structure model from iteraive SAD phasing of the previous example was input to OASIS and performed a "simulative MR-model completion", in which the SAD signals are completely discarded. This resulted in a model amount to 72% of the whole structure. It can be seen from the following figure that the improvement is significant. The control panel with settings for this example, the monitoring board recording the whole process and the PyMOL display of the resultant model are also shown respectively in the following figures.
All the above examples including original data files and job-parameter files (job.def) are provided with
the "Full package" download version of OASIS4.0 in the diectory "examples". Inside the directory there
are 4 subdirectories "MR", "SAD-1", "SAD-2" and "SADMR". Move them to your CCP4 "project" directory,
all the above examples can then be rerun in your computer. In order to retrieve the settings stored in the
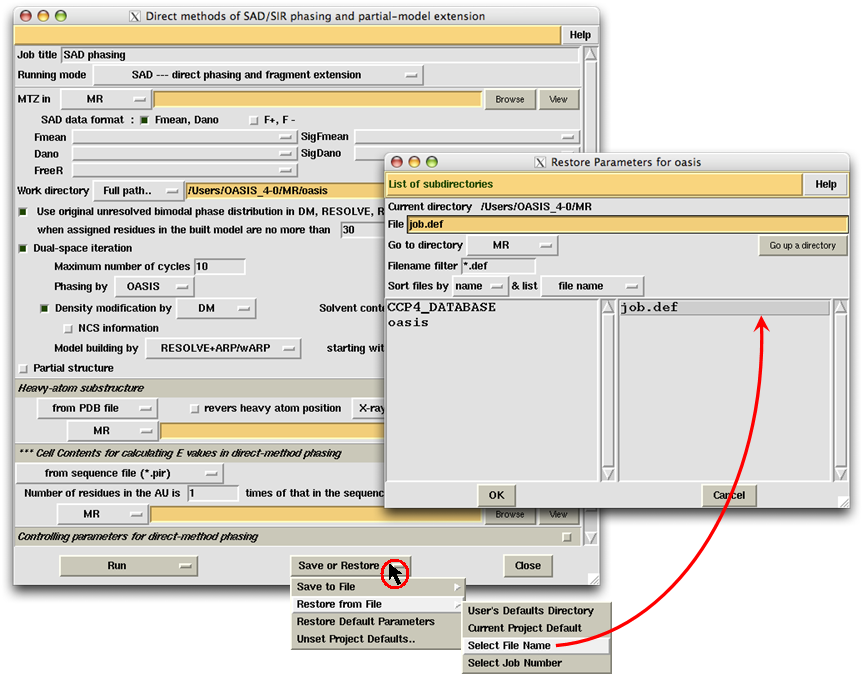
file "job.def", the user should open the file with the "Save or Restore" button at the middle of bottom on
the control panel (see the following figure).
